Login
- Switch on your baling machine
- Make sure Bluetooth is activated on your smartphone
- Open the Spinfire application
- Click on the red Bluetooth icon in the top right-hand corner
- From the “Bluetooth connection” page, find your device and select “CONNECT”*.
- Your application will confirm that your device is now “Connected to Spinfire”.
- You can now “UNCONNECT” or use the back button in the top left corner to access the “Remote” page, now displaying a green Bluetooth icon and your device’s battery life.
* You’ll notice a signal strength value to the left of the available Spinfires. If there are several Spinfires around you, the lowest value represents the nearest machine. For example, -68 is closer than -83.
First steps with the App
When you open the Spinfire app for your first workout, we recommend that you take a few minutes to familiarize yourself with it. In this section, we’ll introduce you to the main pages, guide you through the various options and explain in detail how to get the most out of your personalized app experience. For iPhone and Apple Watch users, please see the Apple Watch section below for watch-specific information.
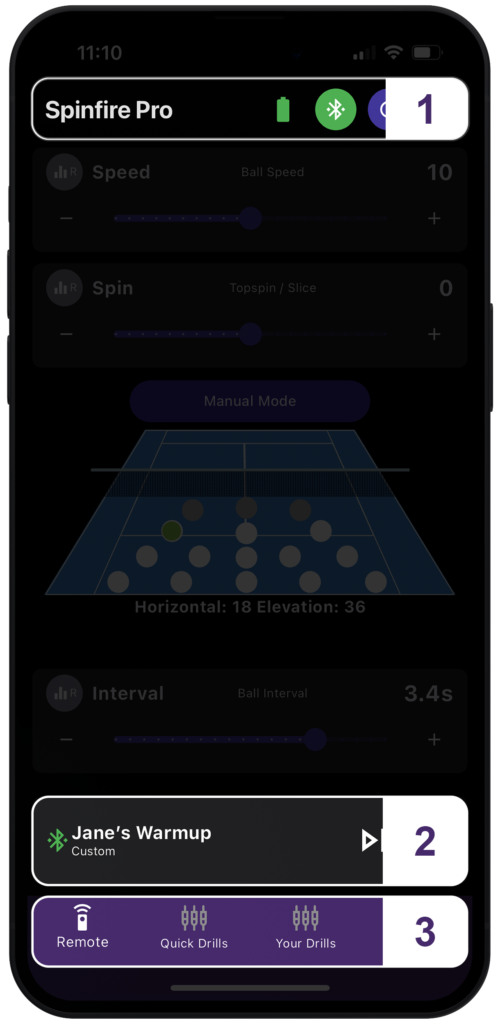
- Header
- Control bar
- Navigation bar
Header
The header features the title of your page, the Bluetooth connection button (and once connected to your device, the battery life is displayed), a reset button to realign the eject direction and the Sleep Mode button. The header shows where you are in the application, and features the back button at the top left when necessary to help you navigate the application.
Control bar
This is the main control for your ball launcher. It appears on every page, helping you to keep track of your current mode or exercise. It gives you access to the Feed and Play button for total control when navigating the application. Use the control bar to eject balls, start and pause, and get a quick overview of your current settings or exercises.
- Bluetooth icon: The green icon indicates that the machine is connected to your smartphone, the red icon that it is disconnected.
- Text: Describes the name and status of the current mode/exercise
- Feed button: Press this button to fire a single bullet, after which the machine automatically pauses.
- Play button: Press the Play button to start firing the balls with the chosen settings and exercises. Press and hold the Play button to access the delayed countdown function and select the number of seconds you want to elapse before the balls start firing.
Pages
Remote
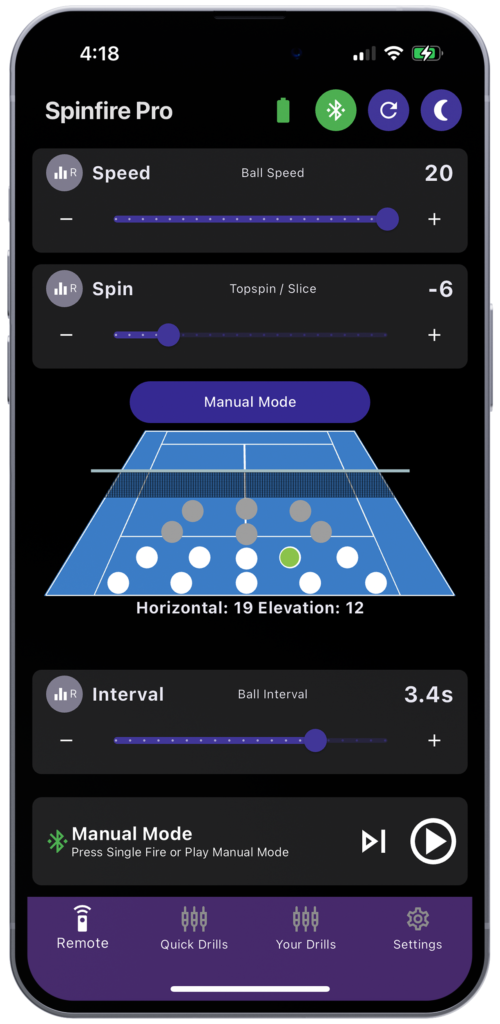
This is the first page you see when you open the application. You’ll see a slider for speed, spin and interval. There’s also a button for “Manual Mode”, a diagram of a tennis/padel court with clickable white ball locations, and a preview of horizontal and elevation values. By clicking on “Manual Mode”, the view changes to include two additional sliders – Elevation and Horizontal – in place of the court visual. You can click on the “Switch to Court Map” button to return to this.
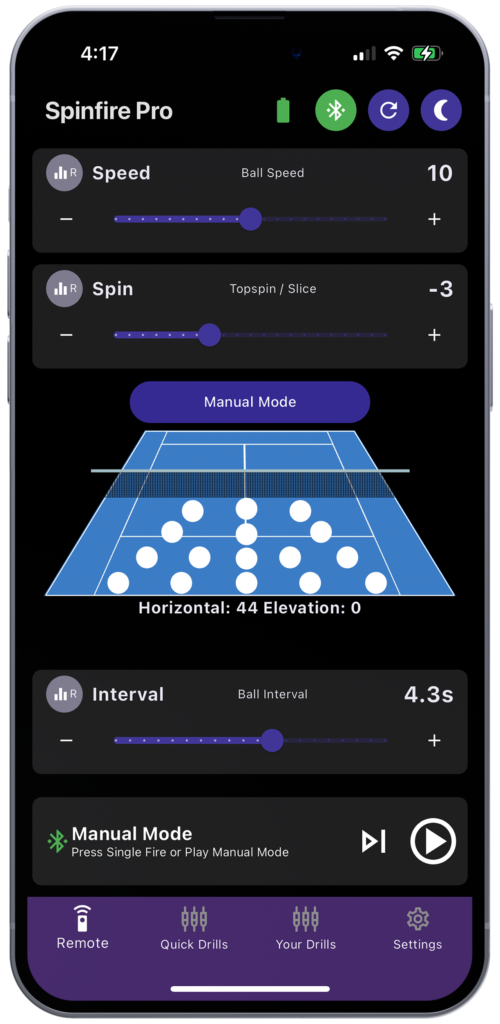
Speed slider
This slider allows you to adjust the speed of the balls between approximately 30 km/h and 130 km/h, with values from 0 to 20. To adjust this parameter, either drag the slider or click the “-” or “+” buttons at either end to make incremental adjustments.
The “R” (for “Random”) button to the left of “Speed” can be clicked to activate the “Random Speed” function. This allows the speed level to vary randomly by a value of +/- 1. Its activated state is represented by a colored icon. To deactivate it, click again: random speed will be deactivated and the icon will turn grey.
Spin slider (“Effect”)
This slider adjusts the ball’s topspin and slice eJects. Values range from -10 to +10, with 0 corresponding to a flat stroke, i.e. a ball with no eJect; -10 corresponds to the most intense slice and +10 to maximum lift. You can vary the slider between these values to define intermediate eJet levels. As before, you can adjust the parameter by dragging the slider, or by clicking on the “-” or “+” buttons at either end to make fine adjustments.
The “R” button to the left of “Spin” can be clicked to activate “Random Spin”. This randomly varies the spin level by a value of +/- 1. Its activated state is represented by a colored icon. To deactivate it, simply click on “R” again.
Interval (“Cadence”) slider
This slider adjusts the ejection frequency of the ball launcher from the slowest (every 15.1 s) to the fastest (1.9 s).
To adjust this parameter, either drag the slider or click on the “-” or “+” buttons at either end to make incremental adjustments.
The “R” button to the left of “Interval” can be clicked to activate the “Random Interval” function. This allows the cadence to be varied randomly by +/- 0.5 seconds. Its activated state is represented by a coloured icon. To deactivate it, simply click on “R” again.
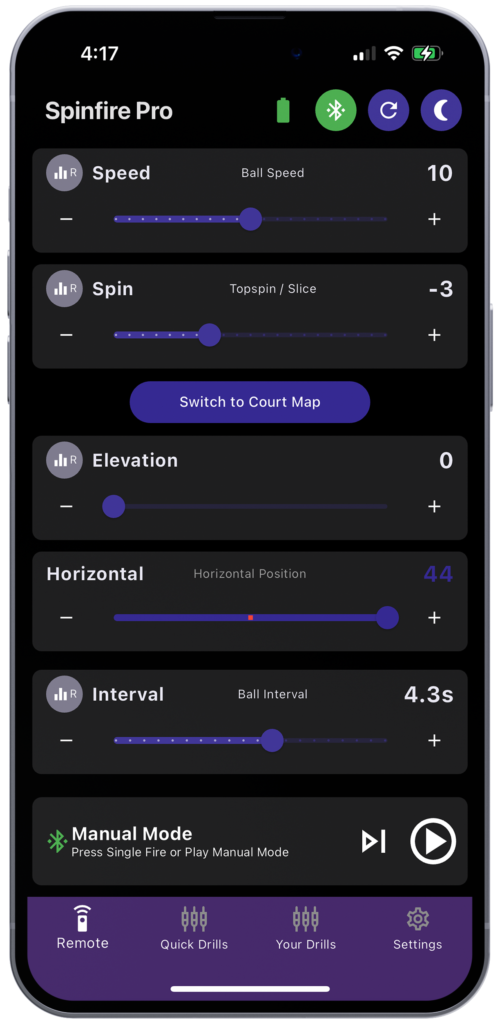
Manual Mode
Elevation slider
This slider adjusts the elevation of the ball. Values range from 0 to 200, with 200 representing the highest rise, often used for lobs.
To adjust this parameter, either drag the slider or click on the “-” or “+” buttons at either end to make incremental adjustments.
The “R” button to the left of “Elevation” can be clicked to activate “Random Elevation”. This will randomly vary the elevation. Its activated state is represented by a colored icon. To deactivate it, simply click on “R” again, and the icon will revert to grey.
Horizontal slider
This slider adjusts the horizontal position at which bullets are ejected from left to right. Values range from -37 to +37, with 0 at the center, -37 at the far left and +37 at the far right. To adjust this parameter, either drag the slider or click the “-” or “+” buttons at either end to make incremental adjustments.
Switch to Court Map
Court Map
Clicking this button brings up a diagram of a tennis/padel court with 16 dots representing the position in which you want your ball to land on the court. Select a position by pressing the relevant spot – it will turn green to indicate that it has been validated. The approximate horizontal and elevation values will be displayed below the illustration. You’ll notice that if you adjust the Speed and Spin sliders, some areas of the terrain will be greyed out and cannot be selected due to the new values excluding certain positions on the terrain. If you notice that your shots are not hitting the locations indicated on the court visual, you may need to calibrate your machine. Please do not hesitate to contact us.
Quick Drills
Here you’ll find a quick way to trigger simple exercises including, for example, random or symmetrical horizontal and vertical oscillations, either pre-recorded or customized. Don’t hesitate to return to the Remote page if necessary to “randomize” or adjust the parameters of the throws.

Vertical Random
This mode is activated by pressing the push-button, which then turns white and moves to the right. If Vertical Random is activated, the machine fires bullets at different depths at random. The mode actually varies the height of elevation, triggering higher/longer or lower/shorter bullets.
For example, you can get 3 balls to the back of the court, followed by 2 short balls, then 1 long ball and finally 3 short balls – completely at random.
This mode can be activated in combination with Horizontal Random, Symmetrical 2 Line or Custom Drills, and is deactivated by pressing the push-button again, which moves to the left and turns purple.
Horizontal Random
This mode is activated by pressing the push-button, which then turns white and moves to the right. With this setting, the machine ejects bullets randomly in the width you choose – from the narrowest (Narrow) and easiest (overall width of one to 2 steps) to the widest (Wide), which corresponds to bullets that can be fired across the entire width of the field. You can combine this mode with other random modes, such as Vertical Random, to have balls at different depths and make your exercise more diJicult. You can also randomize speed, spin and interval as explained on the Remote page. The mode is deactivated by pressing the button again, which moves to the left and turns purple. Note that this setting is also automatically deactivated if you activate a competing, non-compatible setting such as 2 Line or Custom Drills.
2 Line or Custom Drills
This mode is activated by pressing the push-button, which then turns white and moves to the right. 2 Line is a forehand/backhand exercise: the machine sends you symmetrical balls, one to the right and one to the left, with the angular extensions of your choice: narrow, medium or wide, the latter being the most difficult and corresponding to the lateral lines of the court. You can combine this mode with other random modes, such as Vertical Random, to get balls at different depths and make your exercise more diJicult. It is deactivated by pressing the push-button again, which moves to the left and turns purple. Note that this setting also deactivates automatically if you activate a competing setting such as Horizontal Random.
Your Drills
“Drill” means “exercise” in sports English. This menu provides access to the most powerful part of the application. Here you can create and save custom drills, apply modifications globally, duplicate and adjust multiple sets of custom throws, and create drills using our AI Drill Creator, our Artificial Intelligence-driven drill creation interface! “Drill” means exercise in sports English. On your first visit to this menu, you’ll notice that it already contains pre-designed custom drills. These can be reorganized, edited and sent to your machine to be played.
Organize and edit your drills
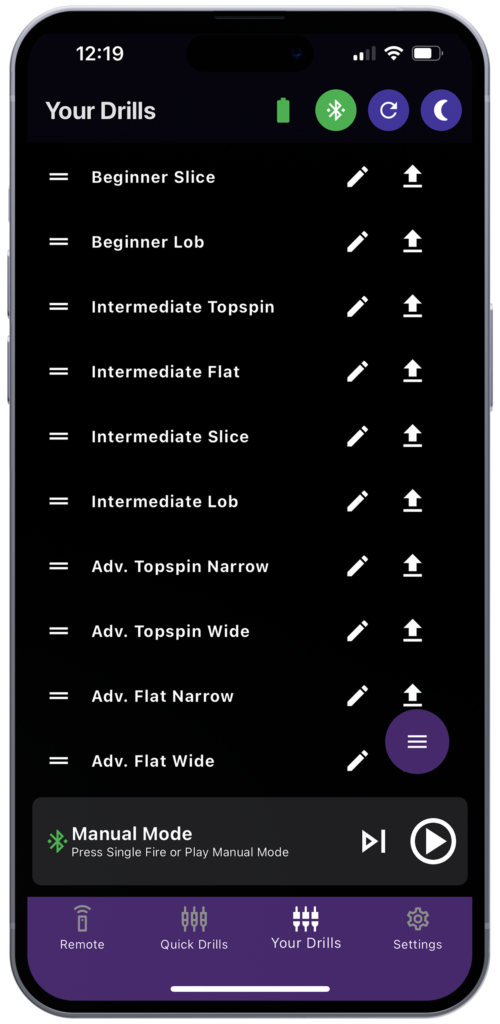

Drag & Drop button
Drag and drop to reorganize your exercises

Edit Drill button
Click to edit, change names, modify sequences and throw parameters

Send Drill button
Click here to send the exercise to your ball launcher

Edit exercise
Change name
Click on the title bar to change the name
Modify All Shots
This button allows you to modify all the ball parameters of the exercise at once.
Throws
Each shot in the exercise is numbered. In non-expanded mode, you can see a list showing the succession of shots in the exercise, with information on each ball (speed, eJet, trajectory, cadence) and three buttons: Arrow (Feed), Trash (Delete) and Copy (Duplicate). If you click on one of these, the screen expands to show a visual of the ball’s target zone on the court and sliders for modifying its parameters. This window can be minimized by pressing on the top of it.
Add a throw
Use the plus (+) button in the bottom right-hand corner to add an additional throw with the parameters of your choice.
Header menu
The three buttons are used to delete, duplicate or save changes made to a drill. Use the Arrow button to return to your exercise list.
Send exercise
Click on the Up Arrow button to send the exercise to your machine. A green frame then appears to confirm that it is active, and it appears in your control bar. You can then press the Play button when you’re ready to play.

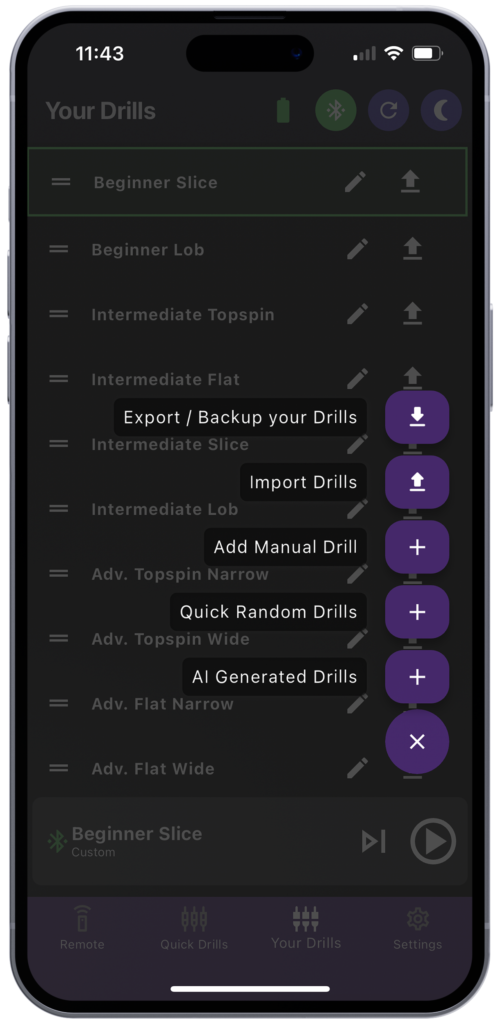
Menu
This button, whose logo represents 3 horizontal bars, contains options for exporting and importing drills and creating new, customized ones.

Export/ Backup your Drills
Export to backup or share with friends. Click on this button and you’ll be prompted to save or share your exercises via a json file. This can be imported again from this menu in the Spinfire App.
Import Drills
Click on this button and you’ll be prompted to “Reset Drills to Default” or “Import Drills from File”. If you choose the latter option, you’ll be asked if you wish to delete all existing drills before importing, you can choose either option, then your device’s file manager will appear to select the drills to be imported.
Add Manual Drill
This function allows you to manually create an exercise from scratch. This screen works in the same way as the edit existing drills screen explained above.
Quick Random Drills
Quickly create drills with this option – which includes sliders for speed, eJet, elevation, horizontal trajectory, cadence and number of strokes to generate for this drill. Click on “Generate Drill” when you’re satisfied and find your drill added to the Your Drills page. Click on “Send drill to machine” to test it in real life.
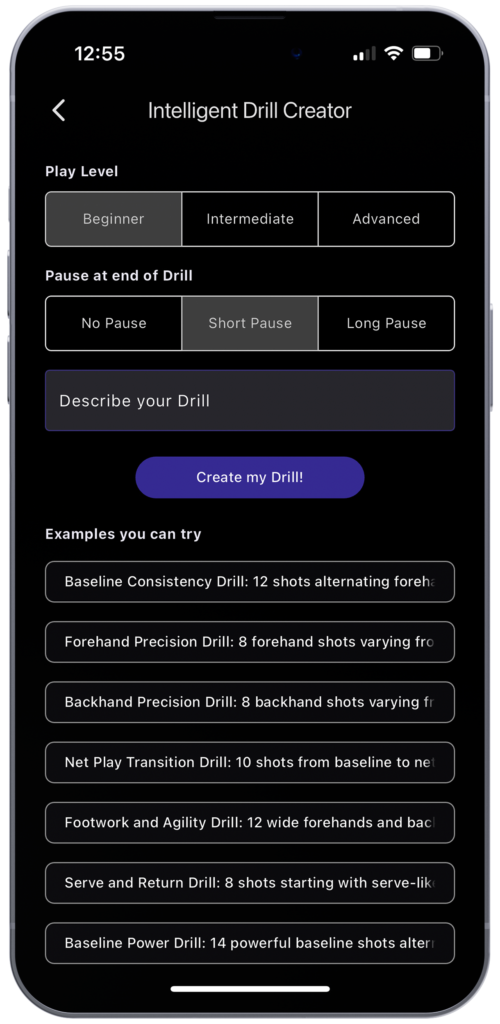
AI Generated Drills
Advanced AI Drill Creator creates drills from instructions (“prompts”). Simply use the first cursor to select your level of play – Beginner, Intermediate or Advanced, then the pause time at the end of the drill – no pause, short pause or long pause. Then click in the text box to describe or name your drill. Finally, click on “Create my Drill! -and watch the Intelligent Drill Creator bring it to life! Once completed, a green box will appear with the drill’s name, confirming that it has been successfully created. You’ll find it on the Your Drills page. You can then press the Send Drill button to start immediately, or click on the Modify button to adjust the parameters.
Settings
On this page, you can access various parameters and information on the software versions of your motherboard and application.
Dark Mode
Activate and deactivate your app’s night mode, to avoid being dazzled by your smartphone’s screen.
Versions
Information on the software version of your machine’s motherboard is displayed above, that of the App below.
Check for Updates
By clicking on this menu, you will obtain one of the following items:
- If you are not connected to the Internet, you will receive a message asking you to connect.
- If you are not connected to the machine, you will receive a message asking you to connect to it.
- If you are fully logged in, the following will appear, click on the button to update:
- Current version: 6.2.8 (example)
- Latest version: 6.2.9 (example)
- Update Firmware” button
Languages
You can change the language of the App among several available languages.
French will be available very soon!
Single Ball Fire Mode
This feature allows you to fire a single bullet. This is useful during coaching sessions to give instructions to students: shoot a single bullet and discuss the exercise. It’s also handy for testing the shots you set up and firing a single bullet to check the parameters.
Advanced Settings
Here you’ll find more technical parameters and troubleshooting options for your ball launcher.
Feeder Safety Mode
The Feeder (rotating carousel that distributes bullets inside the launcher) stops rotating normally after a few seconds if it detects that there are no more bullets to fire. You can enable/disable this option.
Sensitivity Settings
This section explains your device’s sensitivity settings. Increasing each of these values makes the system more sensitive, but can also lead to false detections:
Ball Jam Sensitivity
Slider from 0 to 20 Adjusts the sensitivity of the system to the detection of bale jams at the ejection wheels (jammed bales). Higher sensitivity increases the probability of false jam detection.
Ball Fire Sensitivity (pitch detection)
Slider from 0 to 20 Controls the sensitivity of the system to detecting bullet shots. Higher sensitivity may result in more frequent false bullet detections.
Feeder Sensitivity
Slider from -20 to +20
Determines how quickly the system detects feed jams. Higher sensitivity causes the system to detect feed jams earlier, which may increase the chance of false feed jam detections.
Determines how quickly the system detects bale jams at the Feeder (carousel). Higher sensitivity causes the system to detect jams ahead of time, which can increase the risk of detecting false carousel jams.
Note: Adjust these parameters with care. Although higher sensitivity can help detect problems earlier, it also increases the risk of false alarms.
Battery Type (type of battery used)
ALS
Sealed Lead Acid (SLA) battery: 10.8 V cut-off voltage, 12.1 V supplied voltage when fully charged
Default Lithium
Standard lithium battery with a voltage profile ranging from 12.0V (cut-off) to 13.2V (fully charged)
Lithium alternative
Alternative lithium battery with a voltage profile ranging from 11.5V to 13.0V.
Reset Settings (reset default settings)
Clicking on this button will reset your ball launcher to its default settings.
- Interval value at 1
- Speed value at 0
- Spin value at 0
- Elevation value at 50
- Feeder Safety Mode activated
- Single Ball Fire Mode deactivated
- Discharge wheels at reference point (machine axis)
- Ball Jam Sensitivity to default value
- Ball Fire Sensitivity to default value
- Feeder Sensitivity to default value
- Bluetooth enabled
- All random modes disabled
Apple Watch
For iPhone and Apple Watch users, your watch becomes an extension of the Spinfire app on your iPhone. You’ll notice that the watch is directly synchronized with your iPhone: the same active workout is displayed on the main control page as on your iPhone, and the Drills page contains all your workouts saved from your iPhone.
Warning: to ensure that your Apple Watch works properly and stays connected throughout your workout, make sure that your iPhone and Apple Watch are within normal Bluetooth range of each other (around 10 meters).
There are 3 pages on the Spinfire app for Apple Watch:
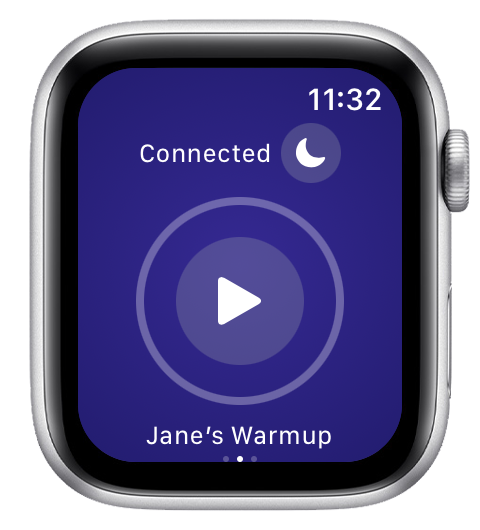
Main control (middle screen of your watch)
This is where you can :
- Connection information
- Button to activate standby mode
- Button to trigger current exercise
- Button to display current year
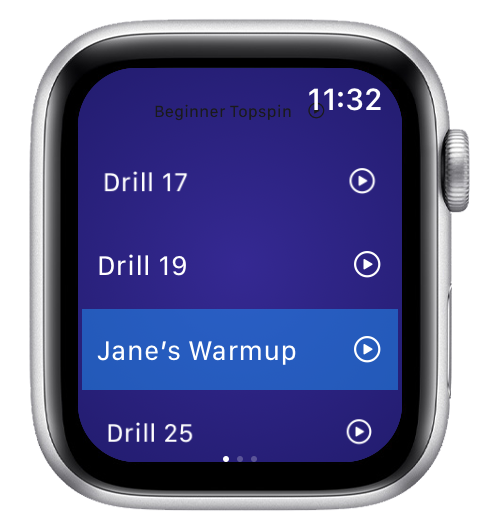
Exercise list (watch left screen)
Browse and select the exercise of your choice from those stored on your iPhone
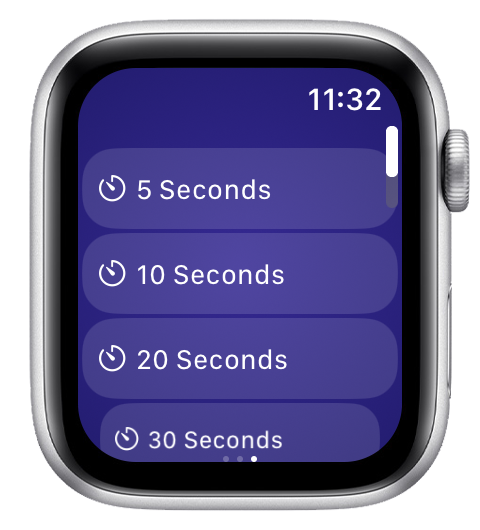
Trigger delays (right-hand display)
Set the self-timer and the time in seconds before the bullets start firing.

